ENGLISH PAPER PIECING (EPP)
English Paper Piecing, EPP, is a traditional method of hand sewing small pieces of fabric together that hold their shape by being secured to paper pieces using either glue or thread.
The shape of paper is traditionally hexagon but there are diamonds, squares, jewels, circles all of which can be combined to make fabulous patterns. Once the pieces have been joined (this is then referred to as a block), the papers are removed and the fabric you have created can be used to sew all sorts of projects from full sized quilts to pincushions – the projects are endless.
You will find lots of inspiration for EPP on Pinterest and the endless various using the different shapes of paper.
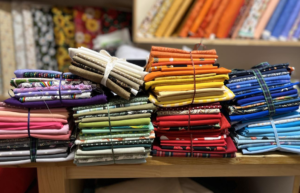
Choosing fabrics
When choosing your fabrics you can use all your scraps of fabrics which will produce a very eclectic fabric block or you can use the same shades or range of fabrics from a particular designer to produce a more coordinated look.
What you will need
You only need a few basic sewing supplies which you will probably already have in your sewing kit. This makes this craft very portable and a great project to take on holiday, visiting a local sewing group or just your favourite

coffee shop. It is also a great conversation starter if you choose to do your EPP in public.
These are the items I have in my EPP kit:
Sharp, short fine hand sewing needles ( sometimes known as straw needles) Needle Threader
Glue Pen & Refills
Good quality 100% cotton thread in a neutral colour
Large fabric scissors
Small scissors (or thread snips)
EPP Paper Pieces – these can be purchased online ready cut or you can download them from the internet and print them off.
Fabrics of your choice.
You can also use a rotary cutter and cutting mat to cut your fabrics but this would make it less portable. I prefer to use scissors but I can also see the merit of using a rotary cutter if you are cutting lots of fabric pieces.
Preparing for piecing
Basting or gluing your fabric to the paper shapes is an important step in preparing to hand-piece your blocks. This is what gives your block pieces their accurate and perfect size and shape.
I am a glue baster and I find it much quicker than thread basting. A simple Sewline Glue Pen works really well.
For each block I do all of my cutting at once and then glue baste the fabric to the templates as my next step. I use small wonder-clips to keep my shapes and cut fabrics organised together until I’m ready to glue them.
Depending on what fabric you are using, you can fussy cut your hexagons so that a particular area/pattern is centered on the paper piece. I do try and place my paper pieces so that I will get as many pieces from the fabric if I am not fussy cutting.
Gluing and preparing the paper pieces
Add a dot of glue in the centre of your paper piece to secure whilst cutting your fabric.

By using just a dot of glue in the centre of one side of the paper piece, it can still be easily removed when ready.
When cutting fabrics to use with English Paper Pieces, add a scant 3⁄8′′ on all sides of the paper piece. Apply glue to each edge.

I’ve also found if I glue close to the edge of my papers but not on the edge, the fabric is secure and the needle goes through the edge of the fabric much smoother than if it’s getting stuck in glue along the edge.

Fold over each side making sure to get a nice crisp edge – folding over one edge then the side next to it, paying attention to get the corners neatly folded until all the edges are folded in.

Sewing the paper piece together
When you have a collection of covered paper pieces you can begin to assemble your fabric blocks.
Thread your needle with a length of thread not more than 50 – 60cm long – any longer and your thread is likely to become knotted or wear and break (this is why it is always a good idea to purchase a good quality thread). Plus longer lengths of thread take longer to sew through the fabric covered paper pieces. I like to thread several needles at once so you can continuing sewing without breaking off to keep threading your needle.
Place the right sides together of the fabric covered pieces, join one of the edges together using small whipstitches on the very edges of the fabric going through the fabric only–not the paper pieces. You can work right to left or left to right – whichever is more comfortable to you.

Continue joining the pieces together – when you have a few pieces joined on all sides you can then start to carefully remove the paper pieces – they should easily pop out if you have not stitch through the paper. Leave any paper pieces that have not been stitched on all the sides so that the edges of the outside pieces remain intact. These can be removed when you have stitched your fabric block into your project.

When you have joined your fabric pieces into a usable piece of fabric this can then be sewn into any project you wish like any other piece of fabric.

Enjoy creating your own designs and patterns using EPP – you can even make tiny hexagons etc for small projects. By using the shapes and your fabrics in different arrangements you can produce stunning results.

Here are a few examples I found on Pinterest to show you how versatile this craft is.